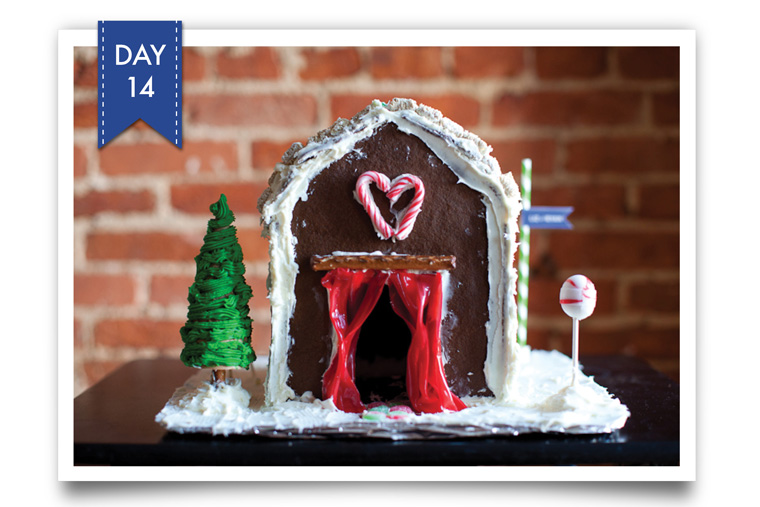
Making Gingerbread houses is a tradition that we used to do every year growing up! It was always an excuse to have a fun party with friends and eat a lot of candy. However, we never actually made gingerbread… the houses were always made out of graham crackers! This year we decided to change it up and actually make gingerbread houses out of real gingerbread with the help of our friends Mason and Clara- and Sophie and Dave too!! ;) For Day 14 of our AMAZING holiday advent calendar, we hope to inspire you to make your very own Gingerbread House! (We even included downloadable blueprints to make it easy!… thanks to engineer Ryan!)
As we were gathering our supplies for our first ever gingerbread house made out of real gingerbread, I was concentrating on how we were going to make those curtains and Ryan was concentrating on the Blueprints! ;) I mentioned that I didn’t really like the part of actually constructing the house… all I wanted to do was decorate. And that was when we were reminded that Ryan and I are actually quite different! ;) Ryan is definitely the engineer and as Ryan put it… I am the “interior decorator.” ;) I must say, that makes us a really good Gingerbread House making team! ;)
And we became an even better team with the help of our friends Mason and Clara! They made it seem extra ok when we decided to join them in eating all of the candy! ;) You will even notice that we had to sacrifice part of Mason’s roof and substitute it with graham crackers! We said it was because the gingerbread did not harden enough… but actually that was a really good excuse to dip that gingerbread into the icing and eat it! ;) It is good to do taste testing, right?! ;)
Huge thanks to Sophie and Dave for letting us make a mess in their dining room while eating a lot of candy and having a ton of fun! ;) Loved every minute of it!
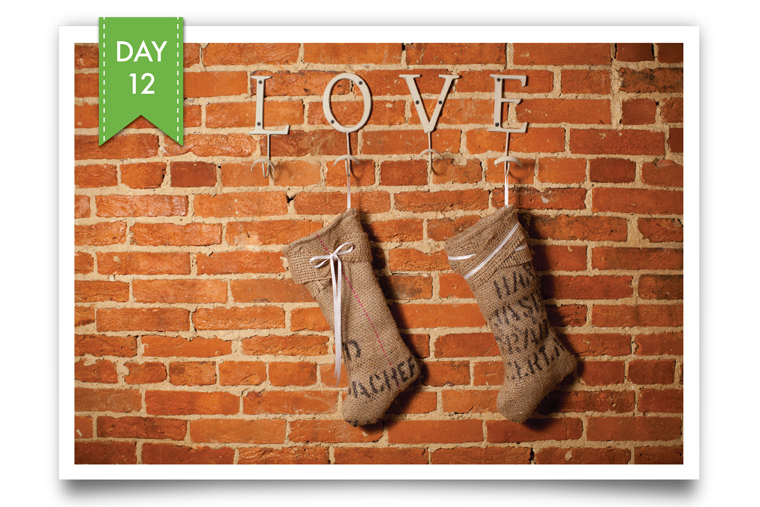
For the longest time (well, five years now) Ryan has had a stocking to hang in our home, but I have not. Each year I talk about making a new set for us, but it never happens. Actually, one year I tried to make them and I only got halfway through until I gave up. However, this year is different and we are determined to make AMAZING happen. If you are in need of some new stockings for you and your family, hopefully you will join us on Day 12 of the Amazing Life Holiday Advent Calendar and make DIY Stockings.
About a month ago, we posted a picture on Facebook of me with my latest craft project material, coffee burlap bags. I was in the middle of making pillows and we asked you all to guess the DIY project I was working on. This was the best game ever because you all gave me the idea to make stockings (and other fun projects too) out of the same fabric! Thank you Amy and Cindy for the suggestion!!! I scoured Pinterest for a few inspiration ideas and then literally made up the design as I went along! It was a little scary… lol, but once I let go of the fact that I didn’t have a plan and took a few minutes to re-learn how to sew… I was good to go and actually had a lot of fun along the way! ;) We are super excited with how they came out and hope you will find these DIY details helpful in making your very own stockings!
DIY PROJECT: Homemade Burlap Stockings
SUPPLIES:
Burlap Coffee Bag (We purchased ours for a $1 donation at our favorite local coffee roaster, Ceremony Coffee)
Felt (about 1 yard)
Ribbon for Decorating
Sewing machine
Needle and Thread
Step 1: Cut 2 pieces of the burlap coffee bag and 2 pieces of the felt in the shape of a stocking. (I used Ryan’s old stocking as a pattern). Be sure to cut the shapes about ½ – 1 inch larger around the edges to give you enough room to sew.
Step 2: Take the front piece of the burlap stocking and place a felt fabric piece on the back. Sew around the edges. (Be sure to keep the front of the fabric facing out). Do the same for the back piece so that you end up with 2 separate pieces (front and back) of your stocking.
Step 3: Place the front and back pieces together with the burlap facing in (your stocking will be inside out at this point). Pin the front and back together (leaving the top edges separate) to make it easier to sew.
Step 4: Before pinning the top of the front and back together, fold down the top edge of each piece. Pin these edges down.
Step 5: Sew across the top edge of the front and back separately to form a nice folded fabric edge.
Step 6: Sew around the edges of the whole stocking. (Of course, leave the top of the stocking open).
Step 7: Turn the stocking right side out and you should have yourself a stocking! ;)
Step 8: If you choose to decorate the stocking, cut out a few strips (about 2-3 feet long) of the leftover burlap. For Ryan’s stocking, I also cut the white ribbon to the same length. For my stocking, I just needed enough of the white ribbon to tie a bow. This is the step where you can really get creative so have some fun with it!
Step 9: To create a look like Ryan’s: sew the white ribbon to the burlap strip. Then, wrap the strip around the top of the stocking, as you would like to arrange it. Once you have an idea of where the two ends of the strip need to come together, sew the edges together to create a little tube that you can just slide over the top of the stocking. Create two of these strips and then crisscross them over the top of the stocking. Once you have them in place where you want them on the stocking, hand sew them with a needle and thread to keep them in place.
Step 10: With your needle and thread, create a hanger loop out of the ribbon you used. Attach the loop to the stocking. Be sure to sew the hanger on firmly so when Santa fills the stocking with presents (or coal… lol) it does not go anywhere!
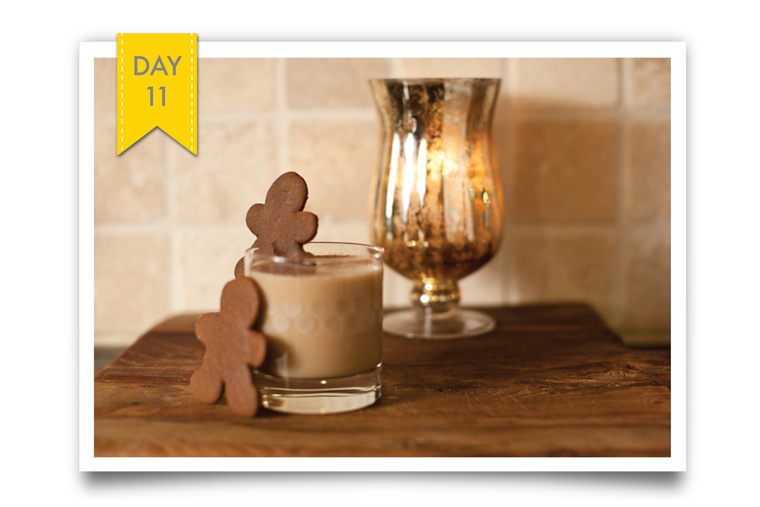
Christmas Eve is one of our FAVORITE days of the year! It ranks right up there with Thanksgiving because it is a day where we get to spend time with so many of our friends and family members! After 2 parties earlier in the day, we finish Christmas Eve at Ryan’s house with a house full of loved ones… and a Christmas Drink! ;) Ryan’s family has a famous Christmas Drink that they serve once a year and we always look forward to it or one of the many other tasty beverages served at Bob’s Neighborhood Pub!
For Day 11 of the Amazing Holiday Advent Calendar, we thought it would be fun to discover a new favorite Christmas Drink that you could share with your family and friends this Christmas Eve!
Today we are sharing a recipe for a super tasty beverage that we recently discovered called The Gingerbread Man! It is crazy tasty… and a little strong! ;) But served with a gingerbread cookie or two and sipped surrounded by family and friends, this is a recipe for a tradition that you will want to keep year after year!
RECIPE: The Gingerbread Man
1/2 ounces of Vodka
1/2 ounces of Goldschläger
1/2 ounces of Bailey’s.
1/2 ounces of butterscotch Schnapps
3-5 ounces of coffee
Add all of the ingredients to a cocktail mixer and shake! Enjoy!
RECIPE: Gingerbread Cookies
INGREDIENTS:
1/2 C butter, softened
1/2 C brown sugar
1/2 C molasses
2 egg yolks
2 C flour
1/2 tsp nutmeg
1/2 tsp baking soda
1/2 tsp baking powder
1 tsp ground ginger
2 tsp ground cinnamon
INSTRUCTIONS
Mix butter and sugar with a stand mixer on medium speed until fluffy. Add molasses and egg yolk and milk until combined. Slowly add in all dry ingredients and mix until fully combined. Chill in refrigerator for one hour or freezer for 20 minutes.
Preheat oven to 350. On a floured surface, roll out dough to approximately 1/4 inch. Use a gingerbread cookie cutter to cut out gingerbread men. Place gingerbread men on a baking sheet lined with parchment paper and bake for 7-9 minutes. Let cool on baking sheet for a few minutes then transfer to a wire rack. Decorate with icing or enjoy plain!
Tip: We sliced a small slit between the gingerbread men’s legs just after they came out of the oven. Once cooled, the cookies will harden and you will then be able to use the gingerbread men to garnish your drink.
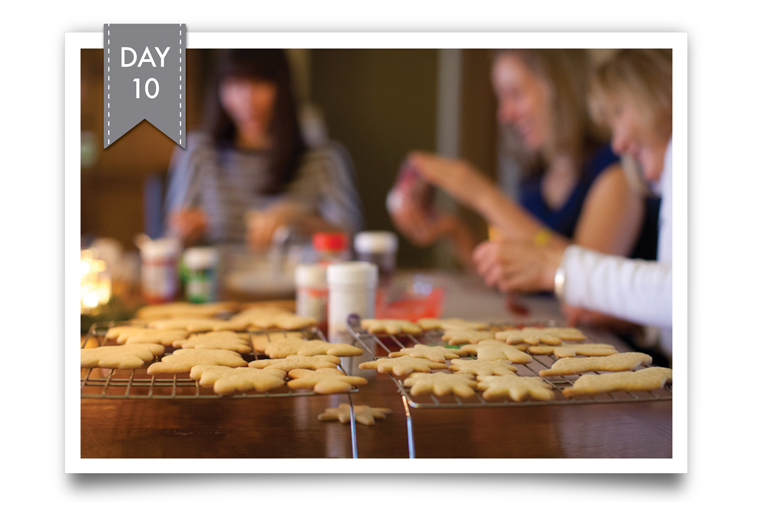
Cookies, cookies, cookies. I am pretty sure that Christmas Cookies always taste better than other cookies! ;) (And that is pretty good considering you never really hear me complaining about eating other cookies! ;) ). We think everyone deserves to treat themselves to a few Christmas cookies AND what better way to spend the day than with some friends in the kitchen?!? So fun!! For this reason alone, we hope you will join us for this 10th day of the Amazing Life Holiday Advent Calendar and Bake Christmas Cookies with Friends. Cookies have always been a huge part of our holiday traditions. Both Ryan and I remember growing up helping our families make hundreds of cookies. Making sand tarts always took the most effort, but they definitely made the most memories! I remember getting up at 5:00 a.m. to start the day at Grandma’s! (Ok, maybe it wasn’t that early- but I know we started early! ;) ). Everyone would have their hand in decorating and we would always make sure we made Ornaments with everyone’s monogram made out of teaberries. Ohh and did I mention, the churches always had to have stained glass windows with different colored sugars? Ryan’s favorite memories of making sand tarts was when they made them on his birthday (coming up super soon! ;) wahoo!)! His mom would cut out tractor trailer trucks especially for him to decorate with his favorite cinnamon balls! ;)
This year our friends Lauren and John invited us over for a day of cookie baking fun! John made his family’s traditional sugar cookies and we had a blast decorating them! ;) This was our first time using icing and boy was that a site to see! ;) It took me a while to get the hang of it- but the best thing was that Lauren and John had a rule that “the only rule at their house was that there are no rules!” It was so great… they didn’t judge us for our cookies! Haha! John even made Ryan a special lobster just for him to decorate (the lobster is like Ryan’s grown up tractor trailer truck! ;) ). It definitely made his day! Haha!
Making cookies surrounded by your friends is such a perfect way to make something incredibly tasty while making new memories! ;) I think that is the real reason that Christmas Cookies taste better than others! ;)
Huge thanks to Lauren and John and Lauren’s parents for inviting us over to join in on their cookie making fun!!! We had a blast! And an extra huge thanks to John for sharing his family’s sugar cookie recipe with all of us! Enjoy!
RECIPE: John’s Sugar Cookies
INGREDIENTS:
1.5 Cups Powdered Sugar
1 Cup Butter, softened
1 Egg
1 tsp Vanilla
½ tsp Almond Extract
2.5 Cups Flour
1 tsp Baking Soda
1 tsp Cream of Tartar
INSTRUCTIONS:
Mix powdered sugar, butter, egg, vanilla, and almond extract. Stir in flour, baking soda, and cream of tartar. Cover and refrigerate at least 3 hours.
Heat oven to 375 degrees. Roll dough 3/16 inch thick on lightly floured cloth. Cut into shapes and sprinkle with decorative sugar (or skip the sugar and add icing and decorations after the cookies have been baked!). Place on cookie sheet. Bake 7-8 minutes, until edges are light brown.
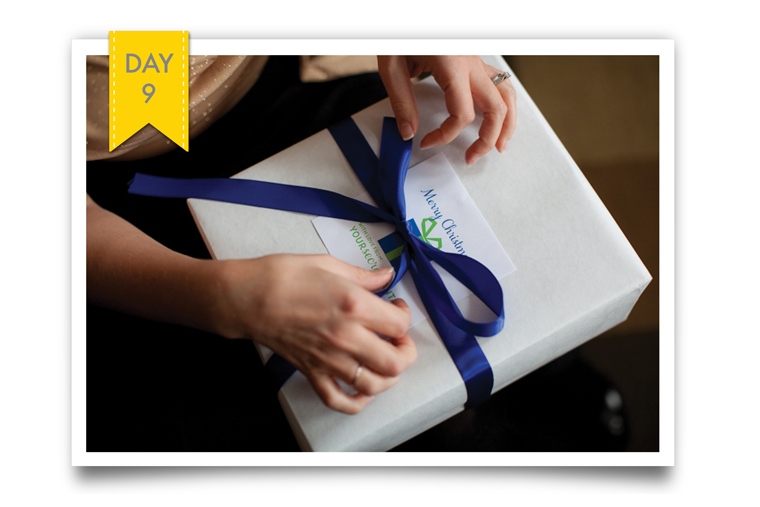
One of our all time favorite things to do is give unexpected gifts! Whether it is something we have DIY’d or a little something that we picked up just because we were thinking about someone special… big or small, giving gifts makes our hearts smile super BIG! So today, we are inviting you to join us in making your own hearts smile super BIG while bringing a smile to someone else’s face too by sending a secret Santa gift to someone special!
Have you ever seen the movie Elf? (If not, go rent it! ;) It is definitely one of our FAVORITE Christmas movies!) At the beginning of the movie they show the elves working super hard to help Santa get the gifts ready for Christmas. They work incredibly hard, but they ALWAYS have a smile on their faces. They never complain… and yes, they get to work with toys (which is super fun), but I think they are always happy because they know that those toys are going to bring a huge smile to someone’s face! There is magic in doing that!
On Friday, Ryan and I were out and about picking up a few things at the store and came across a gift that would be perfect for some special in our lives! ;) This person isn’t necessarily someone who was “on our list” for Christmas… but it was perfect and we knew it would bring a smile to her face, so that was every reason to pick it up and send it as a secret gift from Santa! We became elves for the day… wrapping the gift up all pretty and signing it with love from Secret Santa! ;)
And now our hearts are smiling even bigger in anticipation of knowing that someone we love is going to have an extra big smile super soon! ;)