Host a Holiday Cookie Exchange: Advent Calendar Day 15

By Liz,

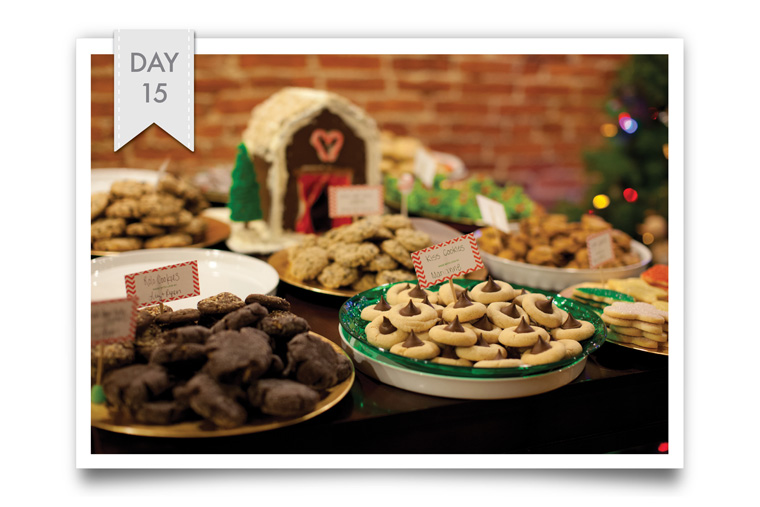
You all know how much we love cookies… especially during the holidays! Well, our love for holiday cookies has just gone to a completely different level! We hosted a holiday cookie exchange and ornament swap date night with our AMAZING couples on Thursday and I have never seen a table so beautifully full of cookies! It was filled with a lot of holiday love and that in itself is reason enough to host a Holiday Cookie Exchange! Did I mention the chance to taste 12 different kinds of cookies that are out of this world AMAZING?!!! For Day 15 of the AMAZING Life Holiday Advent Calendar, we hope to inspire you to gather the AMAZING people in your life and Host a Holiday Cookie Exchange.

Having never hosted a Cookie Exchange before, we weren’t really sure what to expect. However, we sent an invitation out and asked everyone to bring at least 36 of their favorite holiday cookies! As our friends arrived and placed their cookies out on the table, my eyes started getting bigger and bigger and my stomach started growling! ;) It was so much fun to see so many different types of cookies (only Allison and Tom and Ryan and I duplicated with our Rolo cookies! :)… but even still, you can never have too many Rolo cookies! ;) ) and see a table full of so much love!

Every cookie has a story… whether it was made in the 30 minutes prior to coming to the party because it was the easiest cookie to find on Pinterest :), or it was the all time favorite cookie of the holidays and has since become a secret family recipe! My favorite part about the evening was hearing all of those stories surrounded by some of our favorite people ever (Ryan might argue that is a close second to tasting all of the AMAZINGNESS! :) )!

Hosting a Cookie Exchange is super easy and super fun. Gather those AMAZING people in your life and invite them to bring their favorite cookies to your home! ;) Then be sure to have supplies ready for everyone to make a cookie platter to take home and enjoy with their family and friends! You will have plenty of cookies… promise! ;)

Huge thanks to our AMAZING couples (and friends) who made our Holiday Cookie Exchange everything that we had dreamed of and more… a table full of love and room full of AMAZINGNESS. You filled our hearts with so much love! THANK YOU!

(More on the Ornament Swap to come tomorrow! ;) ).

Make a Gingerbread House – Advent Calendar Day 14

By Liz,

Making Gingerbread houses is a tradition that we used to do every year growing up! It was always an excuse to have a fun party with friends and eat a lot of candy. However, we never actually made gingerbread… the houses were always made out of graham crackers! This year we decided to change it up and actually make gingerbread houses out of real gingerbread with the help of our friends Mason and Clara- and Sophie and Dave too!! ;) For Day 14 of our AMAZING holiday advent calendar, we hope to inspire you to make your very own Gingerbread House! (We even included downloadable blueprints to make it easy!… thanks to engineer Ryan!)

As we were gathering our supplies for our first ever gingerbread house made out of real gingerbread, I was concentrating on how we were going to make those curtains and Ryan was concentrating on the Blueprints! ;) I mentioned that I didn’t really like the part of actually constructing the house… all I wanted to do was decorate. And that was when we were reminded that Ryan and I are actually quite different! ;) Ryan is definitely the engineer and as Ryan put it… I am the “interior decorator.” ;) I must say, that makes us a really good Gingerbread House making team! ;)

And we became an even better team with the help of our friends Mason and Clara! They made it seem extra ok when we decided to join them in eating all of the candy! ;) You will even notice that we had to sacrifice part of Mason’s roof and substitute it with graham crackers! We said it was because the gingerbread did not harden enough… but actually that was a really good excuse to dip that gingerbread into the icing and eat it! ;) It is good to do taste testing, right?! ;)

Huge thanks to Sophie and Dave for letting us make a mess in their dining room while eating a lot of candy and having a ton of fun! ;) Loved every minute of it!


Cut your own Christmas Tree: Advent Calendar Day 13

By Ryan,

Nothing makes it feel more like Christmas then the smell of a fresh cut live tree.  Ever since I was young I have had the experience of hiking out into the woods to cut down that perfect tree.  Once Liz and I got married, we continued the tradition and have cut down our own live tree each year.  For Day 13 of our Advent Calendar, we are sharing our Christmas Tree Cutting adventure and encourage you to cut your own tree too!

For us city folk, there is just something extra magical about getting in our car and driving out to the country to cut down a Christmas tree.  Sure we could pick one up at any one of the dozen or so places they are sold in the city but then we would miss out on the fun that mother nature has for us.  This year we headed up to the Jarrettsville Nurseries (click here for coupons on a tree!) to find the perfect addition to our home.

A quick side note, we strongly considered purchasing a live tree in a burlap bag/pot this year. (Thanks to Sere for suggesting it on Facebook as her way of making her Christmas AMAZING this year! ;) We did some research and unfortunately we don’t really have anywhere to transition the tree from indoor to outdoors in order to keep it alive to plant after Christmas.  Also, we don’t really have anywhere to plant a tree… lol. But that wouldn’t have stopped us because I am sure we could have found a school or a park that would be happy to take it off our hands!  However, we also read that you should only keep them in your home for 4-7 days?!?… If anyone reading our blog has experience with live trees, leave us a comment! We’d love to hear from you and to learn more about your experience because we would ABSOLUTELY love to do this in the future!!

And now back to our Tree Cutting Adventure Date Day! :)

They had a few saws, but we came prepared and brought our own. :)

After we decided which type of tree we wanted, we grabbed a sled and were off.  We wanted that strong Christmas smell of a fresh tree so we decided on a Douglas Fir, which according to our friend at the tree farm has the strongest aroma.

This tree was easily over 12 feet tall!  I definitely had a Christmas Vacation moment… our neighbor from across the street saying “Where do you think you are going to put a tree that big, Ryan!”  And if you have seen the movie you know what my response would have been.  :)

Since Liz finally convinced me this one was too big, and that we didn’t exactly want to live out that Christmas Vacation scenario, we decided to continue on.

This picture looks like I am giving the tree eskimo kisses!?!?  It definitely smelled AMAZING so maybe I was! ;)

Is this the one?

And of course we had to get a picture of us together next to our new family member, aka “Lucy the Tree.” That’s Lucy on the left.  After we took the picture above, Liz looked at it and started laughing.  Apparently she didn’t think the saw was very romantic.

Attempt two without the saw. :)

“Trust me, I know what I am doing” :)

Success! We found our tree! Today we will be adorning her with fine accouterments, so be sure to follow us on Facebook to see Lucy once she is all lit up and looking pretty! :)  And if you have any fun Tree Hunting Adventure Date Day Stories of your own, be sure to leave a message in our comment box! We love to hear from you!


Make DIY Stockings: Advent Calendar Day 12

By Liz,

For the longest time (well, five years now) Ryan has had a stocking to hang in our home, but I have not. Each year I talk about making a new set for us, but it never happens. Actually, one year I tried to make them and I only got halfway through until I gave up. However, this year is different and we are determined to make AMAZING happen. If you are in need of some new stockings for you and your family, hopefully you will join us on Day 12 of the Amazing Life Holiday Advent Calendar and make DIY Stockings.

About a month ago, we posted a picture on Facebook of me with my latest craft project material, coffee burlap bags. I was in the middle of making pillows and we asked you all to guess the DIY project I was working on. This was the best game ever because you all gave me the idea to make stockings (and other fun projects too) out of the same fabric! Thank you Amy and Cindy for the suggestion!!! I scoured Pinterest for a few inspiration ideas and then literally made up the design as I went along! It was a little scary… lol, but once I let go of the fact that I didn’t have a plan and took a few minutes to re-learn how to sew… I was good to go and actually had a lot of fun along the way! ;) We are super excited with how they came out and hope you will find these DIY details helpful in making your very own stockings!

DIY PROJECT: Homemade Burlap Stockings

SUPPLIES:

    • Burlap Coffee Bag (We purchased ours for a $1 donation at our favorite local coffee roaster, Ceremony Coffee)
    • Felt (about 1 yard)
    • Ribbon for Decorating
    • Sewing machine
    • Needle and Thread

Step 1: Cut 2 pieces of the burlap coffee bag and 2 pieces of the felt in the shape of a stocking. (I used Ryan’s old stocking as a pattern). Be sure to cut the shapes about  ½ – 1 inch larger around the edges to give you enough room to sew.

Step 2: Take the front piece of the burlap stocking and place a felt fabric piece on the back. Sew around the edges. (Be sure to keep the front of the fabric facing out). Do the same for the back piece so that you end up with 2 separate pieces (front and back) of your stocking.

Step 3: Place the front and back pieces together with the burlap facing in (your stocking will be inside out at this point). Pin the front and back together (leaving the top edges separate) to make it easier to sew.

Step 4: Before pinning the top of the front and back together, fold down the top edge of each piece. Pin these edges down.

Step 5: Sew across the top edge of the front and back separately to form a nice folded fabric edge.

Step 6: Sew around the edges of the whole stocking. (Of course, leave the top of the stocking open).

Step 7: Turn the stocking right side out and you should have yourself a stocking! ;)

Step 8: If you choose to decorate the stocking, cut out a few strips (about 2-3 feet long) of the leftover burlap. For Ryan’s stocking, I also cut the white ribbon to the same length. For my stocking, I just needed enough of the white ribbon to tie a bow. This is the step where you can really get creative so have some fun with it!

Step 9: To create a look like Ryan’s: sew the white ribbon to the burlap strip. Then, wrap the strip around the top of the stocking, as you would like to arrange it. Once you have an idea of where the two ends of the strip need to come together, sew the edges together to create a little tube that you can just slide over the top of the stocking. Create two of these strips and then crisscross them over the top of the stocking. Once you have them in place where you want them on the stocking, hand sew them with a needle and thread to keep them in place.

Step 10: With your needle and thread, create a hanger loop out of the ribbon you used.  Attach the loop to the stocking. Be sure to sew the hanger on firmly so when Santa fills the stocking with presents (or coal… lol) it does not go anywhere!

Discover a new Christmas drink: Advent Calendar Day 11

By Liz and Ryan,

Christmas Eve is one of our FAVORITE days of the year! It ranks right up there with Thanksgiving because it is a day where we get to spend time with so many of our friends and family members! After 2 parties earlier in the day, we finish Christmas Eve at Ryan’s house with a house full of loved ones… and a Christmas Drink! ;) Ryan’s family has a famous Christmas Drink that they serve once a year and we always look forward to it or one of the many other tasty beverages served at Bob’s Neighborhood Pub!

For Day 11 of the Amazing Holiday Advent Calendar, we thought it would be fun to discover a new favorite Christmas Drink that you could share with your family and friends this Christmas Eve!

Today we are sharing a recipe for a super tasty beverage that we recently discovered called The Gingerbread Man! It is crazy tasty… and a little strong! ;) But served with a gingerbread cookie or two and sipped surrounded by family and friends, this is a recipe for a tradition that you will want to keep year after year!

RECIPE: The Gingerbread Man

    • 1/2 ounces of Vodka
    • 1/2 ounces of Goldschläger
    • 1/2 ounces of Bailey’s.
    • 1/2 ounces of butterscotch Schnapps
    • 3-5 ounces of coffee

Add all of the ingredients to a cocktail mixer and shake! Enjoy!

RECIPE: Gingerbread Cookies

INGREDIENTS:

    • 1/2 C butter, softened
    • 1/2 C brown sugar
    • 1/2 C molasses
    • 2 egg yolks
    • 2 C flour
    • 1/2 tsp nutmeg
    • 1/2 tsp baking soda
    • 1/2 tsp baking powder
    • 1 tsp ground ginger
    • 2 tsp ground cinnamon

INSTRUCTIONS

Mix butter and sugar with a stand mixer on medium speed until fluffy.  Add molasses and egg yolk and milk until combined. Slowly add in all dry ingredients and mix until fully combined. Chill in refrigerator for one hour or freezer for 20 minutes.

Preheat oven to 350. On a floured surface, roll out dough to approximately 1/4 inch.  Use a gingerbread cookie cutter to cut out gingerbread men.  Place gingerbread men on a baking sheet lined with parchment paper and bake for 7-9 minutes.  Let cool on baking sheet for a few minutes then transfer to a wire rack. Decorate with icing or enjoy plain!

Tip: We sliced a small slit between the gingerbread men’s legs just after they came out of the oven.  Once cooled, the cookies will harden and you will then be able to use the gingerbread men to garnish your drink.  

  Category: Celebrating the Everyday
  Comments: Comments Off on Discover a new Christmas drink: Advent Calendar Day 11