Giving Back: Liz and Ryan + Thirst Relief International

By Ryan,

Water is one of the most basic needs that we all share. It is likely that each and everyday we wake up and take for granted that we will have clean water to shower in, to brush our teeth with, and to drink. But, what if we didn’t have clean water? What if the water we drank to quench our thirst just made us sick? For many, that is the reality of each day…

Since a very young age, both Liz and I have had a strong passion to give back to and to make an impact on the lives of others. We have been so fortunate and blessed to have the opportunities we have had in life and we believe everyone should have the same opportunities as us. So, when we attended our first WPPI conference three years ago, one of the things we were the most excited to see was a talk on photography and philanthropy. Photographer Jim Davis Hicks and a small group were speaking about a recent trip to Tanzania. It just so happens that Jim was also the founder of Thirst Relief International. While in Tanzania, Jim and the group helped install Bio Sand Filters that would provide clean drinking water for a lifetime.  Jim spoke further about Thirst Relief International and their mission and instantly we were hooked. With just $5 we could save a life and provide clean drinking water for a lifetime to someone in need.

This past year as we began thinking about our new brand and website, Liz and I talked a lot about what we could do to give back. How could we run our business with authentic gratitude and passionate hearts to give back and make a difference in the lives of others?  It was as simple as “$5 saves a life.” So, to go along with this week’s Amazing Life Manifesto theme of “Pay It Forward”, we are excited to announce that with each new amazing wedding couple we book we will be paying it forward and 10% of their photography collection costs will be donated to Thirst Relief International.

We have setup a fundraiser on the Thirst Relief International website titled “The Liz and Ryan Mission” fundraiser. You may view the fundraiser here and we would love it if you donated to Thirst Relief. Take a moment to think about it, $5 can save a life. What can you do today to save $5 and to save a life? This afternoon we will share where the first $10.00 donation in our fundraiser came from.

Images used in this post are courtesy of Thirst Relief International, www.thirstrelief.org


Liz’s DIY: Rustic Chic Herb Garden

By Liz,

Ohh Pinterest, sometimes you just make my heart sing!  ;)  While browsing through Pinterest, I came across a few herb gardens that just jumped out at me.  You all know our love for cooking… so having fresh ingredients in our home is something we have been trying to accomplish for awhile now, but we aren’t the best at keeping plants alive!  This herb garden seemed to make it look easy…. So I figured why not try it!?!  At least it would be cute even if it ended up not being functional!  ;)  We could always buy new plants right?!  ;)

Our fabulous Intern Caitlin joined us on this project!  And I must say- it was definitely a team effort!  ;)  As much as I would like to say we did this all on my own (I probably could have, because it is honestly not that hard) but we enjoyed having Ryan around!  I must give him credit for troubleshooting when we couldn’t get the screw through the metal, keeping us on track when we found ourselves just chatting and watching him do the work, and of course taking all of these beautiful photos to document the process!  Gotta love him!  ;)

We had an old barn floorboard in our basement that was left over from a previous project (we might just have to share photos of that too, because we are pretty pumped with that project too).  It just so happens that the floorboard was cracked anyway- so it just made sense to split it down the natural crack to create two bases.

We purchased the herbs from one of our favorite local nurseries (Valley View Farms).  The rest of the supplies we picked up at our local ACE Hardware store.

SUPPLIES WE USED:

    • Barn Floor Board (any piece of old rustic wood will work)
    • Herbs (Cilantro, Basil, Parsley, and Oregano)
    • 12 oz. Mason Jars
    • Metal Pipe Clamps (large enough to fit the width of the Mason Jars
    • 1 Small bag of Small Rocks
    • Organic Soil
    • Key Hole Fasteners
    • Wood Screws


TOOLS WE USED:

    • Drill
    • Flathead Screw Driver
    • Sharpie
    • Tape Measure
    • Hammer and Nail

Once we had everything together, we were ready to rock n’ roll!

PROJECT INSTRUCTIONS:
Step 1: First We split the wood.

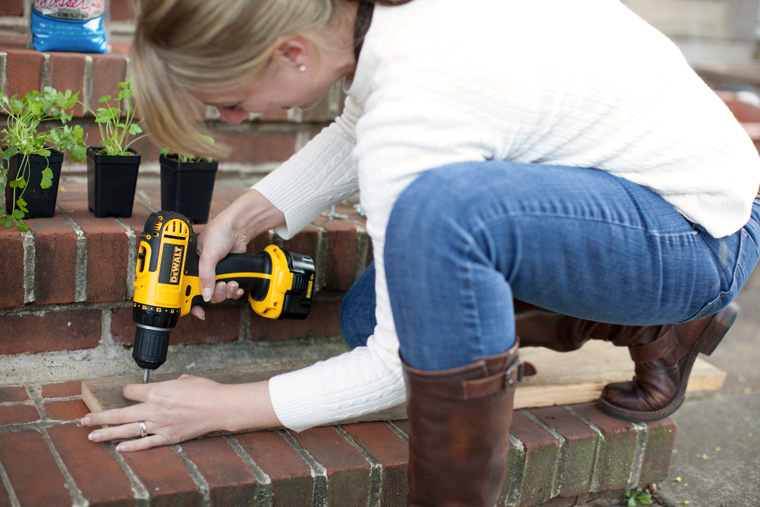
Step 2: Next we started off with the power tools and screwed the keyhole fasteners to the back of the wood for easy hanging when we were done.  (Special Tips:  Make sure the drill battery is charged.  ;)  And make sure the drill is not set in reverse when you are trying to drill into the wood.  ;)  Yes, after about 2 minutes of thinking I was just super weak and didn’t know how to use a power tool, we figured it out! ;) ).

Step 3: Once the hanger was secured, we turned the board over so it was right side up and we could begin spacing everything out.  At this point, we had tightened the metal pipe clamps around the mason jars so we knew where we needed to drill them.  After just guessing on where to place the jars for mine, Caitlin was smart enough to get a tape measure out and space the jars 7 inches apart.  The tape measure also served as a straight line to make sure everything lined up perfectly!

Step 4: Once we knew where we wanted to place the jars, we used a sharpie to make a mark on the wood where we needed to secure the pipe clamp.  It was easier for us to drill into the clamp with the clamp unfastened.  Since the slits in the clamp are so slim, the drill struggled to get the screw through the metal.  Thanks to Ryan, we decided to use a hammer and nail to make a hole in the clamp that we could screw into.

Step 5: When the holes were all made, we were ready to screw them into the floorboard where we had already made our marks.  The drill made it easy and within minutes the clamps were all in place.

We tightened the clamps around the mason jars making them just tight enough to slide the jar in and out.

Step 6: Now it was time to plant!  I had read a post about indoor herb gardens in Mason Jars not working because of mold growing on the roots because there is nowhere for the Mason Jar to drain.  They recommended adding rocks to the bottom of the jar to give the roots some room to breathe.  So that is what we did.  We started with about 1 inch of rocks in the jars.  Then we added about 2 inches of fresh Organic dirt.  The last step was placing the herbs right into the Mason Jars.  And- they are adorable!  ;)

Step 7: Once all of the Mason Jars were planted, we placed them back into the tightened pipe clamps and tightened them just a bit more.

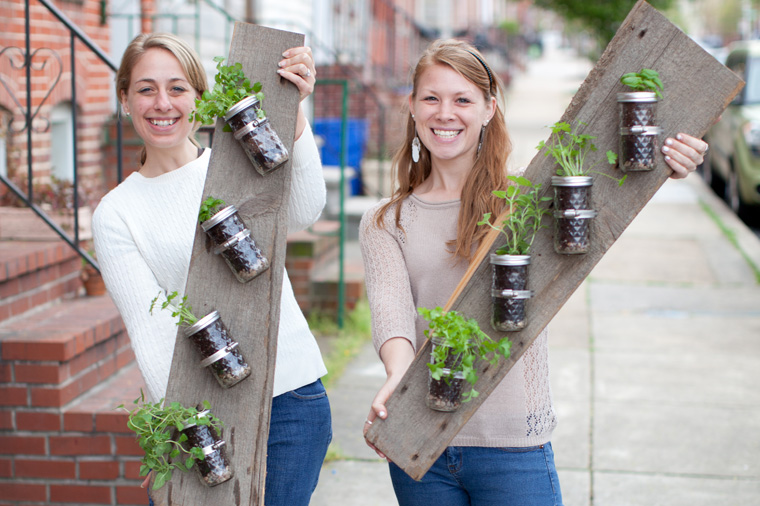
Viola… we made ourselves a pretty awesome looking Rustic Chic Herb Garden!  So much fun!

What a fun project!  Power tools (once you figure out why they aren’t working) make any DIY project more fun!  ;)

We actually completed this project a few months ago and sadly I was not very good about giving the plants the sunlight that they needed and we have since lost our herbs!  Lol.  However, as promised earlier, it still makes a super cute decoration for our wall!  ;)  We have plans to plant new plants and try this again for the fall!  We will keep you posted on my plant care progress!  ;)  It is certainly a work in progress! ;)

Let me know if you have any questions or want more info on the project!  Or, if you decide to make one yourself… please share pics! We love to see your projects too!


Liz’s DIY Intro

By Liz,

Have you ever flipped through your favorite magazine (like Real Simple or Martha Stewart) or browsed through Pinterest and thought to yourself, I could totally do that!?!?  But then you just add it to your To Do list and it ends up falling off your list because everything else seems so much more important?!

Ok- maybe it is just me… lol…. But since early this year, I have had this urge to bring out my craftiness again!  It has been a long time since I have taken time to do a DIY project just for fun!  Earlier this year I read The Happiness Project by Gretchen Rubin.  It was pretty fantastic (and I definitely recommend it!) The book reminded me of the importance of taking time to do things that I LOVE and make ME happy.  Whoa… yeah, that is hard for me as I am pretty much always thinking of the happiness of others before I think about myself.  As I read the book, I realized that the times in my life that I have felt beaten down or burnt out was because I was not taking care of myself.  I was not getting enough sleep and honestly I was not thinking about myself at all.  How am I supposed to lift other people up if I am not taking care of myself first?  So anyway, I had many, MANY aha moments while reading The Happiness Project.  You should definitely check it out!

Besides being with Ryan and doing the work that I love to do everyday as a photographer and entrepreneur, I decided it is time for me to get back to crafting and doing random projects that give me a sense of accomplishment!  ;)  After sharing my plan with friends, many of them expressed interest in joining me!!  What better than hanging out with friends while doing crafts?!?  It takes me right back to the Craft Center at Bucknell!  ;)  Love that!

Since crafting and DIY projects bring me so much joy, we have decided to document them and include them as a part of our blog!  After all- the blog is meant to share the stories of our lives… and this is all part of the everyday Liz and Ryan!  ;)  Hopefully some of our DIY projects will spark your own creativity, or at least give you a good laugh when we share the bloopers and projects that may not have worked!  ;)

Be sure to check back in later this afternoon for my first full DIY Project!

Love Story: Dena and Kevin’s Old Mill Wedding

By Liz and Ryan,

She stood inside a small room, out of sight of their guests as her father stood guard nearby. Soft tears began to form as her sister quickly tried to distract her.  Laugher followed but the tears quickly returned. Time moved slowly as the last few guests scurried to their seats. With each moment, the emotions become stronger, until at last, she whispered, “does this happen to all brides,” and laughter once again filled the air.  It was a perfect moment, and with a deep breath she was ready to walk down the aisle to her future husband.

The music changed and it was her turn to enter the church. As she approached, his face lit up with joy. Finally the moment had arrived in which he could call her his wife.  His smile was infectious and just a glimpse of it quickly turned the tears on her face into a bright smile full of love.  This moment was perfect, this moment they would be husband and wife.

Congratulations Dena and Kevin! Your wedding was beautiful and your reception was AMAZING! From the perfect venue to the candy apple favors, it was truly a night to remember! We hope you are enjoying your European adventures! We can’t wait to share the rest of your photos with you when you get back!

Thanks to all of the amazing vendors that help make Dena and Kevin’s night perfect!!!

Photographer: Liz and Ryan | Ceremony Venue: Saints Philip and James Parish | Reception Venue: The Old Mill | Invitations: Made by Jessa | Hair Stylist: Brooke Berner, Joseph Anthony Salon & Spa | Makeup Artist: Imelda Pajan, Ambiance Salon & Spa | Florist: Holly Battistoni | Caterer: Conner Catering | DJ: Dave Schaffer-Schaffer Sounds | Videographer: ShoFilms | Transportation: Cescaphe Trolley | Bride and Bridesmaids Attire: The Wedding Touch

Enjoy more of Dena and Kevin’s wedding photos in their slideshow below.

AMAZING Life Manifesto: Pay it Forward

By Liz and Ryan,

The other day we were at Spoons enjoying some coffee and brunch after beautiful wedding the day before. We were chatting about the wedding when I overheard a lady at the bar ask for another mimosa and explain that she was coming off a full 2 week period of being full time momma without a break. She went on to explain that life as a single parent is not always the easiest, but she has a beautiful young daughter to go home to that makes her incredibly happy.

It was at that moment that I turned to Ryan and again thanked God for the amazing blessings in our lives.A little while later, the same lady asked for her check. The waitress replied that the young woman sitting across from her at the bar had already taken care of her bill. A look of shock and amazement immediately filled her face. She was in disbelief and immediately asked how she could reach the young lady to say thank you.We had just witnessed an amazing example of Paying It Forward. A complete stranger took the time to listen and do just a little something to make her day just a little bit better!

A simple gesture, such as paying for someone else’s meal, offering to watch a friend’s kids to give the parents a night out, or carrying a box for someone who looks like they could use some help can go such a long way. For the lady in Spoons who was on the receiving end, it restored her “faith in humanity.” One simple gesture can do so much!

This week, it is our hope that you find a way to Pay It Forward. Go out of your way to do something nice for someone. Let us know how you bring a smile to a stranger’s face this week! We can’t wait to hear.