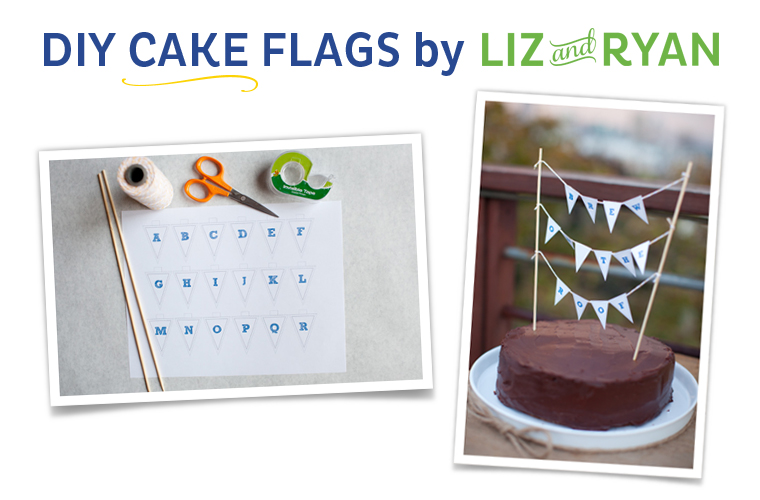
Happy Election Day! We are about to head out to vote but before we do we wanted to share a super easy DIY project to +1 your next Ghirardelli Chocolate Stout Cake! To create your own Cake Flags just download our mini cake flags pdf by clicking here and follow the instructions below.
Finally, if you haven’t checked out our recent Brew on The Roof feature on Style Me Pretty be sure to do so here and enter to win a $25 Williams-Sonoma Gift Card by clicking here and leaving us a comment!
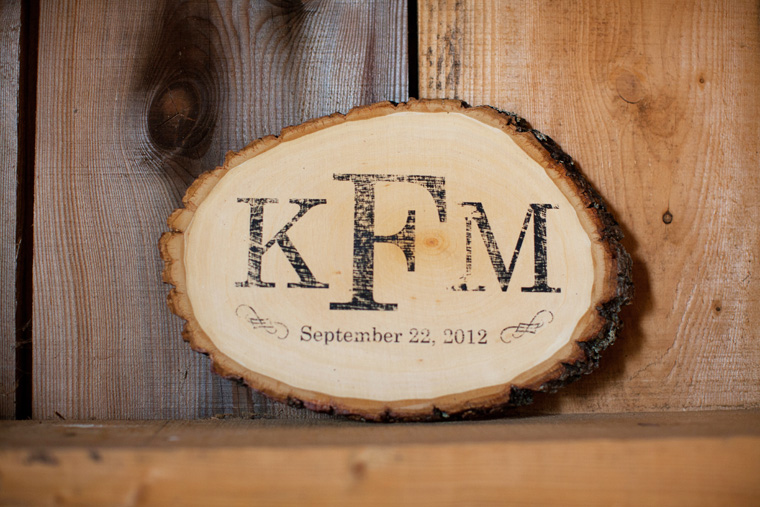
A few weeks ago we asked our fabulous intern Caitlin to help us brainstorm some fun DIY projects we could highlight on the blog! She came back with like a million super fun projects that we could do! However, when she showed us a block of wood with writing on it, we got super excited!! Anything with raw wood that could be turned into something chic… we are on it! ;)
It just so happens that my cousin Kaylene and her now husband, Matt, also have a love for all things rustic. When Caitlin and I were planning the details for this DIY, I couldn’t stop thinking about creating something fun for Kaylene and Matt to have on their wedding day and beyond! We decided to create a monogramed wood block for them!
The results of this project still blows my mind! My friends…. this project is super duper easy and the finished product is definitely something I would display in my house forever!
SUPPLIES WE USED:
Elmer’s Glue
Mod Podge
Paint Brush
1 Piece of white Card stock
1 Wood Slab (I had no idea, but they sell these real wood slabs in all different shapes and sizes at Michaels! Who knew?!)
ALSO NEEDED: A design (We used Adobe InDesign to create Kaylene and Matt’s monogram, but you could easily use Microsoft Word or similar program.)
PROJECT INSTRUCTIONS:
Step 1: Paint a solid layer of glue across a full blank sheet of card stock. Leave the painted card stock to dry overnight. (It might be helpful to paint 2 or 3 sheets of the card stock just in case you mess up.) When the paper is dry it will look like the picture below on the right.
Step 2: Design a graphic that you would like to include on the wood slab. This does not have to be a monogram. It could be just 1 word or even a full quote! The possibilities are endless!!! Once you have a design made on your computer, use the design program to reverse the image so that it prints backwards (as seen below). Put the dry piece of card stock in your printer so that the image will print on the glued side. Print the image. (Our printer is a little crazy at times so we had to help guide it through! But it still worked just fine!)
Step 3: Cut off the excess white space around the edges of the printed card stock. Paint a solid layer of Mod Podge onto the wood slab. Before it dries, place the card stock (design side down) onto the wood and press firmly. Use your fingers to rub over the design and release any air bubbles.
Step 4: When the paper feels firmly against the wood without any air bubbles, flip the wood over onto a flat surface. Add extra weight to the top of the wood to assure a constant pressure. Leave the project to dry for 8 hours.
Step 5: This is where the magic happens! Run the wood slab with the card stock attached under hot water. (As hot as your hands can take! Don’t burn yourself!). After a few minutes you will begin to see the card stock bubble. Don’t force the paper away from the wood… just let the water continue to make it bubble. Eventually the paper will come loose from the wood and fall off.
The end result is an awesome looking rustic wood slab! We gave this to Kaylene and Matt the day before their wedding and they ended up using it for some photos on the day of! It is such a great little piece of decor that they can always have in their home to remind them of their special day!!
I love this project and can’t wait to do it again! I am thinking a simple quote would look super awesome and would be great decor for our home! Let us know if you try this project! We would love to see what you do with it! Have fun!
I am super excited today… not only because we have taken over Bucknell University‘s Career Center’s twitter feed (@BisonINCareers) to share a Day In the Life of being an entrepreneur and photographer!! (Wahoo!!… be sure to check it out and get a glimpse behind the scenes of all of the craziness over here! ;) )…. but I am also super excited because I get to share not one, but TWO DIY projects with you today!! Both of these projects were made especially for Kaylene and Matt’s special day!
This first project is the personalized hanger my cousin Jenna and I made for Kaylene! Jenna and I had been chatting about a special gift for Kaylene and the idea of a personalized hanger came up! There are TONS of super cute wire personalized hangers on Etsy, but we wanted it to be extra special. I had seen a super cute DIY project that included rope words… so I figured why not make it into a hanger?! Jenna was up for the adventure and we made up the steps as we went along! ;) We are happy to say that we are pretty excited about the results! This Mrs. Francis twine hanger fit perfectly with Kaylene and Matt’s rustic wedding decor and it was the perfect way to add a special touch to their wedding day!
Here are the details and step-by-step process Jenna and I used to make Kaylene’s personalized wedding hanger! It was actually pretty easy… but it is definitely messy! ;)
SUPPLIES WE USED:
1 Wooden hanger (from a photographer’s perspective, the notches on the ends are super helpful to keep the dress hanging! ;) )
2 Eye Hooks
1/2 Cup Corn Starch (Check the back of your cupboards for this one… Ours expired in 2008… lol, but it is perfect for crafting!)
Rope or Jute
4 oz. Elmer’s Glue
1/2 cup warm water
Parchment Paper
Pencil
You will see a trend in all of my DIY posts… they always seem to include the help of other people! ;) Crafting is more fun with friends!
PROJECT INSTRUCTIONS:
Step 1: Screw the eye hooks into the bottom of the hanger. I just used my hands (no tool required). It does take some patience to get it started, but once you make a hole it gets much easier. Screw it in far enough that the hook feels secure.
Step 2: Lay out enough parchment paper to cover the length of the hanger. Place the hanger onto the parchment paper. Use a pencil to draw the name/word that you want to hang from your hanger. For us, we wrote Mrs. Francis. It was helpful to write it out as if it was one continuous word (as it will show when you use the twine to actually make it). We used lowercase cursive letters to make it look best. Please note: you are using a pencil for a reason! ;) Don’t be afraid to erase and start over if you need to! Once you have your name/word written, place your hanger to the side.
Step 3: Mix the cornstarch, water, and glue into a medium sized bowl. Mix until the mixture is no longer clumpy.
Step 4: Unravel the rope/jute and begin to run it through the cornstarch mixture. The rope/jute should be completely submerged and covered. However, be sure to leave about 2 feet un-dipped at each end of the word to make it easier to tie around the eye hook. (We learned this the hard way!)
Step 5: This is where it starts to get messy. Squeeze off any excess cornstarch mixture and begin to use the rope/jute to trace the name/word you drew onto the parchment paper. Feel free to use some force to create creases and folds. Be patient and hold the rope/jute into place when needed.
If the letters begin to look funky or illegible, feel free to go back and tweak it! You have several minutes until it begins to hold firm. It worked best for us to complete the name and then go back and tweak it to make it perfect. You can add extra cornstarch mixture to specific spots where it needs a little extra stability.
Like I said… it gets messy, so don’t be afraid to get your hands dirty! ;)
Step 6: Once the name/word looks good to you, leave it to dry for at least 12 hours. And yes, it does take that long! Believe me, I started to doubt that it was going to stay in its shape, but the next day it was good to go!! Once it is dry and firm, clean up the word by removing any flaky pieces of the dried mixture. If you have any flimsy areas that need extra support, feel free to use hot glue to make it stand firm.
String the extra rope/jute at the beginning and end of the word through the eye hook and tie a knot to hold it in place! Then Voila! Done! ;) How cute would this be to make for all of the bridesmaids in your wedding?!?… or of course for a Bride-to-Be in your life!
Below is the finished Mrs. Francis hanger in action on Kaylene and Matt’s wedding day! ;) Cute right?!? Check out more photos from their amazing rustic PA wedding here.
Let me know if you have any questions at all! I am more than happy to help if I can! ;) I would love to hear if you can think of any other fun uses for this! Have fun and don’t forget to check back in later today for another super fun and rustic DIY project!
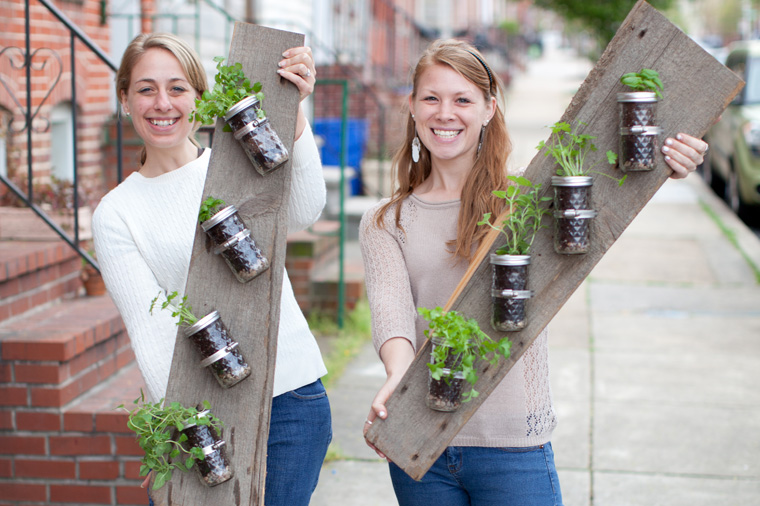
Ohh Pinterest, sometimes you just make my heart sing! ;) While browsing through Pinterest, I came across a few herb gardens that just jumped out at me. You all know our love for cooking… so having fresh ingredients in our home is something we have been trying to accomplish for awhile now, but we aren’t the best at keeping plants alive! This herb garden seemed to make it look easy…. So I figured why not try it!?! At least it would be cute even if it ended up not being functional! ;) We could always buy new plants right?! ;)
Our fabulous Intern Caitlin joined us on this project! And I must say- it was definitely a team effort! ;) As much as I would like to say we did this all on my own (I probably could have, because it is honestly not that hard) but we enjoyed having Ryan around! I must give him credit for troubleshooting when we couldn’t get the screw through the metal, keeping us on track when we found ourselves just chatting and watching him do the work, and of course taking all of these beautiful photos to document the process! Gotta love him! ;)
We had an old barn floorboard in our basement that was left over from a previous project (we might just have to share photos of that too, because we are pretty pumped with that project too). It just so happens that the floorboard was cracked anyway- so it just made sense to split it down the natural crack to create two bases.
We purchased the herbs from one of our favorite local nurseries (Valley View Farms). The rest of the supplies we picked up at our local ACE Hardware store.
SUPPLIES WE USED:
Barn Floor Board (any piece of old rustic wood will work)
Herbs (Cilantro, Basil, Parsley, and Oregano)
12 oz. Mason Jars
Metal Pipe Clamps (large enough to fit the width of the Mason Jars
1 Small bag of Small Rocks
Organic Soil
Key Hole Fasteners
Wood Screws
TOOLS WE USED:
Drill
Flathead Screw Driver
Sharpie
Tape Measure
Hammer and Nail
Once we had everything together, we were ready to rock n’ roll!
PROJECT INSTRUCTIONS: Step 1: First We split the wood.
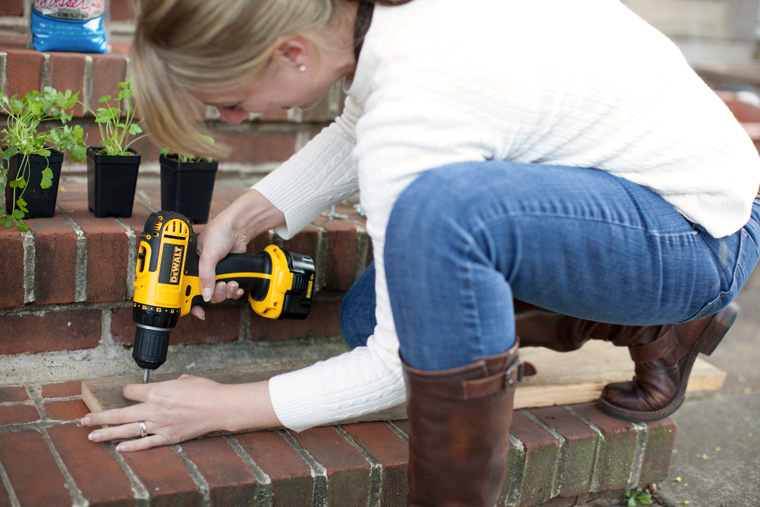
Step 2: Next we started off with the power tools and screwed the keyhole fasteners to the back of the wood for easy hanging when we were done. (Special Tips: Make sure the drill battery is charged. ;) And make sure the drill is not set in reverse when you are trying to drill into the wood. ;) Yes, after about 2 minutes of thinking I was just super weak and didn’t know how to use a power tool, we figured it out! ;) ).
Step 3: Once the hanger was secured, we turned the board over so it was right side up and we could begin spacing everything out. At this point, we had tightened the metal pipe clamps around the mason jars so we knew where we needed to drill them. After just guessing on where to place the jars for mine, Caitlin was smart enough to get a tape measure out and space the jars 7 inches apart. The tape measure also served as a straight line to make sure everything lined up perfectly!
Step 4: Once we knew where we wanted to place the jars, we used a sharpie to make a mark on the wood where we needed to secure the pipe clamp. It was easier for us to drill into the clamp with the clamp unfastened. Since the slits in the clamp are so slim, the drill struggled to get the screw through the metal. Thanks to Ryan, we decided to use a hammer and nail to make a hole in the clamp that we could screw into.
Step 5: When the holes were all made, we were ready to screw them into the floorboard where we had already made our marks. The drill made it easy and within minutes the clamps were all in place.
We tightened the clamps around the mason jars making them just tight enough to slide the jar in and out.
Step 6: Now it was time to plant! I had read a post about indoor herb gardens in Mason Jars not working because of mold growing on the roots because there is nowhere for the Mason Jar to drain. They recommended adding rocks to the bottom of the jar to give the roots some room to breathe. So that is what we did. We started with about 1 inch of rocks in the jars. Then we added about 2 inches of fresh Organic dirt. The last step was placing the herbs right into the Mason Jars. And- they are adorable! ;)
Step 7: Once all of the Mason Jars were planted, we placed them back into the tightened pipe clamps and tightened them just a bit more.
Viola… we made ourselves a pretty awesome looking Rustic Chic Herb Garden! So much fun!
What a fun project! Power tools (once you figure out why they aren’t working) make any DIY project more fun! ;)
We actually completed this project a few months ago and sadly I was not very good about giving the plants the sunlight that they needed and we have since lost our herbs! Lol. However, as promised earlier, it still makes a super cute decoration for our wall! ;) We have plans to plant new plants and try this again for the fall! We will keep you posted on my plant care progress! ;) It is certainly a work in progress! ;)
Let me know if you have any questions or want more info on the project! Or, if you decide to make one yourself… please share pics! We love to see your projects too!
Have you ever flipped through your favorite magazine (like Real Simple or Martha Stewart) or browsed through Pinterest and thought to yourself, I could totally do that!?!? But then you just add it to your To Do list and it ends up falling off your list because everything else seems so much more important?!
Ok- maybe it is just me… lol…. But since early this year, I have had this urge to bring out my craftiness again! It has been a long time since I have taken time to do a DIY project just for fun! Earlier this year I read The Happiness Project by Gretchen Rubin. It was pretty fantastic (and I definitely recommend it!) The book reminded me of the importance of taking time to do things that I LOVE and make ME happy. Whoa… yeah, that is hard for me as I am pretty much always thinking of the happiness of others before I think about myself. As I read the book, I realized that the times in my life that I have felt beaten down or burnt out was because I was not taking care of myself. I was not getting enough sleep and honestly I was not thinking about myself at all. How am I supposed to lift other people up if I am not taking care of myself first? So anyway, I had many, MANY aha moments while reading The Happiness Project. You should definitely check it out!
Besides being with Ryan and doing the work that I love to do everyday as a photographer and entrepreneur, I decided it is time for me to get back to crafting and doing random projects that give me a sense of accomplishment! ;) After sharing my plan with friends, many of them expressed interest in joining me!! What better than hanging out with friends while doing crafts?!? It takes me right back to the Craft Center at Bucknell! ;) Love that!
Since crafting and DIY projects bring me so much joy, we have decided to document them and include them as a part of our blog! After all- the blog is meant to share the stories of our lives… and this is all part of the everyday Liz and Ryan! ;) Hopefully some of our DIY projects will spark your own creativity, or at least give you a good laugh when we share the bloopers and projects that may not have worked! ;)
Be sure to check back in later this afternoon for my first full DIY Project!