Category: Liz’s DIY

DIY: Gold Honeycomb Martini Glasses

Celebrating the Everyday, Liz's DIY  //  

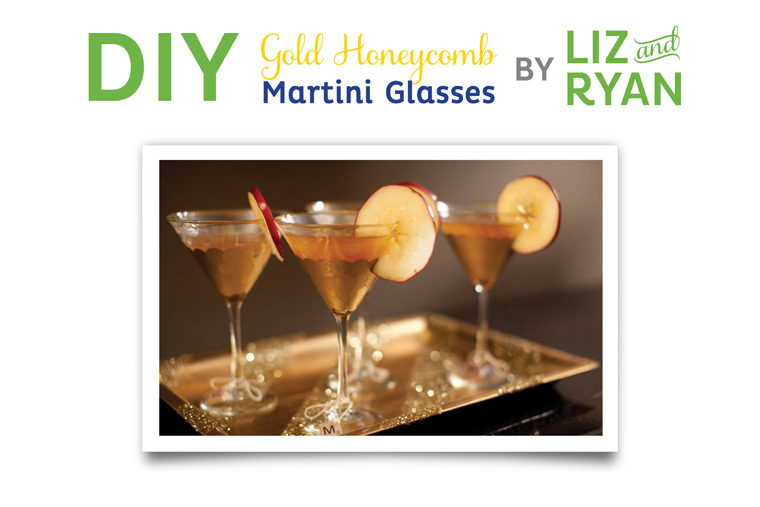
Our Thanksgiving Leftover Party and Game Night would not have been complete without tasty cocktails.  And in order to serve tasty cocktails you need to have fun glasses.  Inspired by some fun gold honeycomb martini glasses Liz saw at West Elm, we decided to create our own chic glasses for the party. Follow along to learn how to create your own DIY Honeycomb Martini Glasses!

Step One: Lay out labels on paper.  To prevent stickers sheets from blowing around when spraying with paint, use a small piece of tape to attach the sheets to the paper.

Step Two: Spray with gold paint

Step Three: Once paint dries, add labels to martini glasses starting at the bottom of the glass and working your way around in a circle.  Be sure to overlap each sticker.

These martini glasses wouldn’t be complete without a tasty cocktail.  Be sure to jump on over to Creative Culinary to learn how to create a SPECTACULAR Caramel Apple Cider Martini!


DIY: Gold Pumpkin and Squash Table Decor

Celebrating the Everyday, Liz's DIY  //  

Welcome back! DIY project #2 of the day is a super easy way to spruce up your Thanksgiving Dinner place settings. As we were out and about recently, we saw lots of stores with festive looking gold pumpkins and squash so we decided to create our own for our Thanksgiving Leftovers and Game Night Party.  With just a little gold spray paint you can create your own and liven up your table or home decor this Thanksgiving.

      • Mini pumpkins and squash from your local market. We got our’s at Whole Foods
      • Painter’s Tape
      • Metallic Gold Spray Paint (in the paint section at Lowe’s)
      • Elmer’s Glue (optional)
      • Glitter (optional)

Step One: Use blue painter’s tape to tape around the stems of the pumpkins and squash. 

Step Two: Spray all sides of the pumpkins and squash with gold spray paint and let dry. Remove tape once paint is dry.

Optional Step: With a small sponge brush paint a thin layer of glue on pumpkin’s and sprinkle on gold glitter to make your decor extra sparkly!


DIY: Custom Glittered Gold Party Invitations

Celebrating the Everyday, Liz's DIY  //  

We have such and AMAZING Tuesday packed full of fun DIY projects for ya’ll today!  Be sure to check back often so you don’t miss any of the fun.  First up is our Custom Glittered Gold Party Invitations for our Thankful For Leftovers and Game Night party.

When we started thinking about the invitations we wanted to create for our Leftover party we wanted it to be something simple yet fun that would be easy for anyone to create.  We LOVE stamps and Liz especially LOVES all things glittery so we decided to combine the two loves in this glittered gold party invitation.  Initially we thought we would have to use a dish sponge and Elmer’s glue for our stamp pad but of course Martha Stewart didn’t let us down! It was almost like she was reading our minds! For this project you will need:


Start by designing your custom invitation in your favorite design program (we used Adobe InDesign).  Or hire your favorite local stationery designer to create a custom design for you.  Once you have your design created, save a portion of the invitation you would like covered in glitter as a separate jpeg. (We decided we wanted to make the word “Thankful” and the small corner design feature gold.) Upload the jpegs to RubberStamps.net and order a custom stamp.  We ordered our stamp by 10 am and it was shipped out the same day! Print your invitations on card stock and follow the instructions below to create the perfect glittery effect.

Step 1: Add a small amount of glue to the glue pad and spread out evenly with a brush or paper towel.

Step 2: Stamp your custom stamp in the glue.  Carefully line up the stamp to the printed invitation and press down.

Step 3: Remove stamp and sprinkle on glitter before glue dries.

Step 4: Pour off excess glitter, let dry, and mail off to friends and family!

DIY Barn Wood Beer Flight Tasting Boards

Celebrating the Everyday, Liz's DIY  //  

Out of all the DIY projects we did for our Brew on the Roof party, making our very own beer flight tasting boards from old barn wood was definitely my favorite project.  With a little bit of sweat (Liz made me use a hand saw to cut the wood so the boards would look more rustic :) ), a few hours on the roof (isn’t everyone’s workshop on their roof?), and 48 holes later, we had the perfect tasting boards for our party.

DIY Party Ideas Beer Flight Tasting Boards by Liz and RyanA few additional details on making your own DIY tasting boards:

If you don’t have access to old barn wood, feel free buy wood at your local hardware store.  And you can also feel free to use a table saw or circular saw to cut the wood to length.  To make the holes in the wood you will need a 2″ forstner bit. We got ours at Lowes.  Also, be sure to have well charged batteries or or a corded drill. Cutting out 2″ holes will cause a lot of strain on the drill and ware the battery out quickly.  Or better yet, find a friend who has a drill press to help out :).  When drilling, be sure to stay as level as possible and only go about 1/2″ to 3/4″ deep into the wood.

Finally, your tasting boards are not complete without tasting glasses.  We purchased ours from a restaurant supply store online and they shipped them directly to our house the next day.  Check out the Webstaurant Store for more details.

If you enjoyed this project, be sure to check out the entire tasting party here and don’t forget to leave us a comment for a chance to win a $25 gift card to Williams-Sonoma.  We will randomly select the winner tomorrow at 5pm EST.  Have a great Thursday!


DIY Beer Tasting Party Project by Liz and Ryan

Brew for Two Beer Sampler DIY

Celebrating the Everyday, Liz's DIY  //  

Good Morning! We are continuing our theme of DIY projects this week with details on how we made the fun Brew for Two Party Favors for our guests that came to our Brew on the Roof Party.  We started with a few empty beer cartons, gray spray paint, and printer labels.  Simply download our Brew for Two labels here and create your own for you next tasting party.

DIY Beer Tasting Party Project by Liz and RyanSee more from our Brew on the Roof Tasting party:

Style Me Pretty Feature
Brew on the Roof Party and Giveaway
Ghirardelli Chocolate Stout Cake
DIY Cake Flags