Category: Liz’s DIY

Be Still | A peek at our DIY Pallet Projects

Celebrating the Everyday, Liz's DIY  //  

It’s funny how when you are busy busy busy doing work that you love, you can so quickly forget about the little things that bring you happiness. When Ryan and I are out and about traveling for work, our brains are occupied on the adventure. We love to travel, so that quickly fills our heart with joy!

Since we have been going going going and have not had any moment in 2013 really to be home and be still, we are finding it almost difficult to do just that! However, we know that is exactly what we need in our lives right now! We honestly are choosing to be super intentional about making time to just be. Our To Do list is now full of a mix of work and fun. In the past, I always thought we needed to get all of our work done before we could go play. Even if we had a project due in 2 weeks, I would have to have it done today before I could relax. It has only taken me 4+ years as a small business owner to realize that there will always be something else to do! Lol! When you love what you do, the thin line between work and fun gets even thinner.

Anyway… this past week we have been doing everything we can to train our minds to be still. Who knew that would be so hard! ;) We have been giving ourselves realistic deadlines and working working working to get the work crossed off our list so that we can do the fun… and then giving ourselves grace when there actually are still work things on the list! We have blocked off time on our calendar to take a few days off in May! WAHOOO! This weekend might be the first weekend in a SUPER long time that we are actually going to take two days to rest and just do the fun! ;)

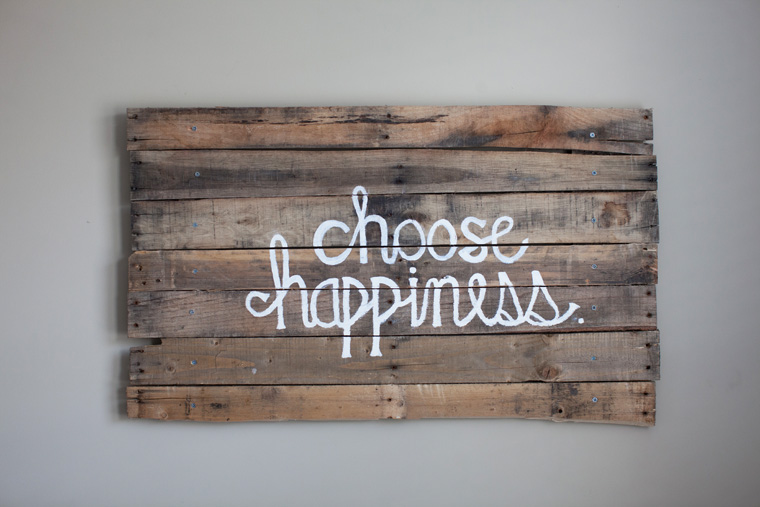
It is my goal over the next few days/weeks to actually focus on what brings us happiness! DIYing, grilling out, hanging out with friends, visiting my brother, exploring new coffee shops, watching the clouds roll by, reading, etc… these are all on our new To Do list! Yesterday we started this new challenge off by making a few DIY Pallet Projects out of the old pallets we gathered a few months ago! It has been on our mind to make a sign for our guest bedroom and hang up those cozy robes we purchased months ago! After a morning of cranking out the work, we spent a few hours in the afternoon playing with some pallets and paint! ;) It took me awhile to just relax and have fun, but when I did… it felt pretty AMAZING! ;)

We hope you will join us this weekend and take some time to be still. Take some time for yourself and celebrate this AMAZING life!

DIY Pallet Projects Photos Wall Art Clothes Hangar Choose Happiness - 1

DIY Pallet Projects Photos Wall Art Clothes Hangar Choose Happiness - 2

DIY Pallet Projects Photos Wall Art Clothes Hangar Choose Happiness - 3
And because life is happier with bright yellow flowers :)
DIY Pallet Projects Photos Wall Art Clothes Hangar Choose Happiness - 4

Make DIY Gift Tags: Advent Day 20

Celebrating the Everyday, Liz's DIY  //  

Ryan and I are HUGE fans of packaging! (I think it stems way back to our mentor and Board of Life Director Dean Badal!) She would have packaging parties around Halloween to send gifts to friends and there was never a detail that was forgotten! She taught us that the box and the wrapping is often just as important (if not more important) than the gift itself!

We thought it would be fun to personalize our gifts this year with an extra special touch! We made DIY Gift tags that were super easy but are sure to leave a lasting impact. Join us on Day 20 of the AMAZING Life Holiday Advent Calendar and spruce up your gifts with some DIY Gift tags!We saw a picture for these Salt Dough gift tags on Pinterest (of course! ;) ) and just loved them! Then we looked at the recipe and read the directions and we were sold! ;) With only 3 ingredients and no baking involved, this project is super super easy! We followed the instructions from blogger She Knows for step-by-step instructions! But seriously, all you need to do is:

    • Mix 1 cup of salt with 2 cups of flour. Then add 1 cup of warm water and mix again.
    • Form the dough into a ball.
    • Roll the dough until it is about ¼ inch thick and then use cookie cutters to cut the shape you would like! We used a round shape, but you could do ANYTHING that you would like! So fun!
    • Stamp the shape with anything you would like… again, we used our Liz and Ryan stamp, but the sky is the limit here!
    • Let the gift tags dry 24-48 hours!

Once they are dry, we plan to write the recipients name on the opposite side of our gift tags! Once we have all of our gifts wrapped and completed with these DIY Salt Dough Gift tags, we will definitely post a photo on Instagram and Facebook! Stay tuned! ;)

Make DIY Stockings: Advent Calendar Day 12

Celebrating the Everyday, Liz's DIY  //  

For the longest time (well, five years now) Ryan has had a stocking to hang in our home, but I have not. Each year I talk about making a new set for us, but it never happens. Actually, one year I tried to make them and I only got halfway through until I gave up. However, this year is different and we are determined to make AMAZING happen. If you are in need of some new stockings for you and your family, hopefully you will join us on Day 12 of the Amazing Life Holiday Advent Calendar and make DIY Stockings.

About a month ago, we posted a picture on Facebook of me with my latest craft project material, coffee burlap bags. I was in the middle of making pillows and we asked you all to guess the DIY project I was working on. This was the best game ever because you all gave me the idea to make stockings (and other fun projects too) out of the same fabric! Thank you Amy and Cindy for the suggestion!!! I scoured Pinterest for a few inspiration ideas and then literally made up the design as I went along! It was a little scary… lol, but once I let go of the fact that I didn’t have a plan and took a few minutes to re-learn how to sew… I was good to go and actually had a lot of fun along the way! ;) We are super excited with how they came out and hope you will find these DIY details helpful in making your very own stockings!

DIY PROJECT: Homemade Burlap Stockings

SUPPLIES:

    • Burlap Coffee Bag (We purchased ours for a $1 donation at our favorite local coffee roaster, Ceremony Coffee)
    • Felt (about 1 yard)
    • Ribbon for Decorating
    • Sewing machine
    • Needle and Thread

Step 1: Cut 2 pieces of the burlap coffee bag and 2 pieces of the felt in the shape of a stocking. (I used Ryan’s old stocking as a pattern). Be sure to cut the shapes about  ½ – 1 inch larger around the edges to give you enough room to sew.

Step 2: Take the front piece of the burlap stocking and place a felt fabric piece on the back. Sew around the edges. (Be sure to keep the front of the fabric facing out). Do the same for the back piece so that you end up with 2 separate pieces (front and back) of your stocking.

Step 3: Place the front and back pieces together with the burlap facing in (your stocking will be inside out at this point). Pin the front and back together (leaving the top edges separate) to make it easier to sew.

Step 4: Before pinning the top of the front and back together, fold down the top edge of each piece. Pin these edges down.

Step 5: Sew across the top edge of the front and back separately to form a nice folded fabric edge.

Step 6: Sew around the edges of the whole stocking. (Of course, leave the top of the stocking open).

Step 7: Turn the stocking right side out and you should have yourself a stocking! ;)

Step 8: If you choose to decorate the stocking, cut out a few strips (about 2-3 feet long) of the leftover burlap. For Ryan’s stocking, I also cut the white ribbon to the same length. For my stocking, I just needed enough of the white ribbon to tie a bow. This is the step where you can really get creative so have some fun with it!

Step 9: To create a look like Ryan’s: sew the white ribbon to the burlap strip. Then, wrap the strip around the top of the stocking, as you would like to arrange it. Once you have an idea of where the two ends of the strip need to come together, sew the edges together to create a little tube that you can just slide over the top of the stocking. Create two of these strips and then crisscross them over the top of the stocking. Once you have them in place where you want them on the stocking, hand sew them with a needle and thread to keep them in place.

Step 10: With your needle and thread, create a hanger loop out of the ribbon you used.  Attach the loop to the stocking. Be sure to sew the hanger on firmly so when Santa fills the stocking with presents (or coal… lol) it does not go anywhere!

DIY: Scrabble Glass Charms

Celebrating the Everyday, Liz's DIY  //  

How many times have you been at a party, sat down your drink and then forgot which glass was yours?  This happens to us all to often so we decided to create some fun DIY glass charms to fit our Game Night theme. We used pieces from an old scrabble game to create these custom glass charms.  Each guest got a wine charm that corresponded to the first letter of their name so no one would forget which glass was theirs.  Follow along below to learn how to create your own DIY Scrabble Glass Charms.

      • Scrabble pieces
      • Divine Twine Baker’s Twine (http://www.etsy.com)
      • Drill and 5/64” Drill bit
      • Needle

Step One: Drill a hole into the corner of each scrabble piece.

Step Two: Cut twine to length, approximately 12 inches.

Step Three: Fold twine in half forming a loop and push through hole in scrabble piece with a needle. Thread the two loose ends of the twine through the loop and pull tight. Tie on glasses in a bow and cut off excess twine.

We hope you enjoyed all of our DIY projects today.  If you missed any, be sure to check them all out by clicking the links below:

Tomorrow we will be sharing all the recipes from our Thanksgiving Leftovers and Game Night Party for ya’ll to host your own leftovers party!


DIY: Glittered Gold Serving Tray

Celebrating the Everyday, Liz's DIY  //  

If you are serving fun cocktails in fun DIY Martini Glasses then it is only natural to make your own DIY Gold Glitter Strip Serving Tray right?  We’ll we thought it was so we picked up a cheap tray at Michael’s and had some more fun with glitter.  Learn how to create your own below!

Step One: Using painter’s tape, mask off area of tray that you do not want covered in glitter.  We created a simple diagonal strip pattern.

Step Two: Pour glue into a small cup and paint onto tray to cover non-masked area.

Step Three: Sprinkle glitter over tray covering all glued areas.

Step Four: Pour off excess glitter and let tray dry.

Step Five: Carefully remove tape.Be even more creative and alternate strips with various colors of metallic glitter for a serving tray that would make Kate Spade proud! :)