Cheers to waking up this morning with a smile on our faces. Cheers to making the decision to do what makes us happy. Cheers to the sunshine and to the rain. Cheers to calling our parents to say hello. Cheers to eating a healthy lunch today. Cheers to writing in our journals and thanking God for all of the amazingness that surrounds us.
Sometimes it is the smallest things… but everyday provides a reason to celebrate! We hope you take some time today to celebrate the everyday. For you, maybe its that you got up 15 minutes earlier to make sure you had time to make yourself breakfast, or maybe you made it to the gym today. Who knows… maybe it is just that you washed the dishes instead of letting them sit in the sink so you have to think about it later.
Here’s to celebrating the simple things that make you smile. Take some time this week to recognize what those simple things are and celebrate them! Everyday!
This past weekend we spent all day on Sunday making pasta. You can read more and find the recipe for some super amazing ravioli here. After we were done making ravioli, we still had some extra dough so we decided to use it to create a dessert ravioli. What we came up with was a FANTASTIC Nutella Churro Dessert Ravioli. Also, we are making these ravioli by hand so if you do not have the Kitchen Aid Mixer Ravioli attachment we used in the last post we will show you how to make ravioli the old fashioned way.
Step 1:Take a sheet of pasta dough and spoon on two scoops of Nutella, approximately 1/2 tbsp each, 1 inch from the edge of the pasta sheet.
Step 2:Fold over the pasta dough until the Nutella is enclosed entirely in a little ravioli pouch. Optionally, to provide a better seal, prior to folding over the pasta sheet you may rub an egg white along the edges of the sheet. Once you have folded over your ravioli, use a knife to cut the ravioli away from the rest of the dough and to separate the two individual raviolis.
Step 3: Using a fork, press down firmly along the outside edges to seal the Nutella inside the ravioli.
Once all the ravioli are sealed, place them in the freezer overnight or for at least 2 hours.
Step 4:While the ravioli are in the freezer, prepare the churro coating. Combine the sugars and cinnamon in a bowl.
Step 5:Bring a pot of water to a rapid boil and add ravioli. While the ravioli cook, melt 2 tbsp of butter in a small pan over medium high heat. Once the ravioli begin to float remove from the water and place in the pan to fry.
When frying anything, be careful as the hot butter may splatter. Allow the ravioli to cook for approximately 2 minutes per side or just until they start to turn crispy and begin to brown.
Step 6:Remove the ravioli from the frying pan and place in a small dish. Thoroughly coat each side with the cinnamon and sugar mixture.
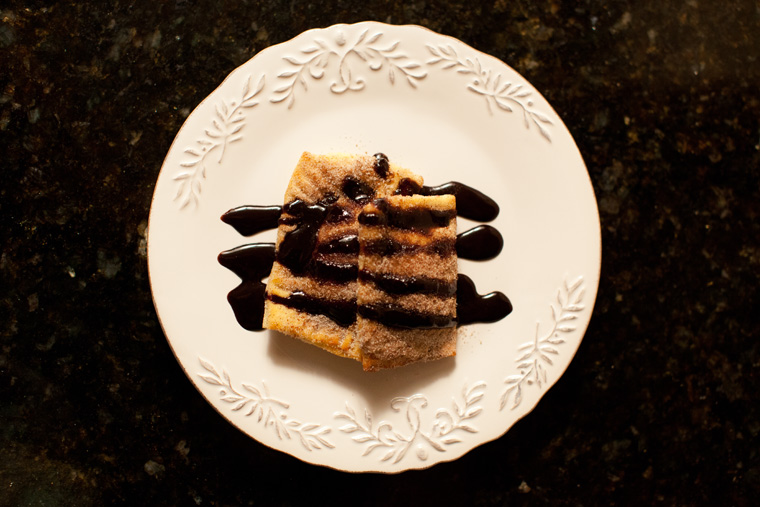
Step 7:Place the Nutella Churro Dessert Ravioli on a plate and drizzle with chocolate syrup.
Time to enjoy an amazingly delicious Nutella Churro Dessert Ravioli!
Cupcakes and wine are probably two of our favorite things. There is just something magical about ending a day of super amazing work with a glass of wine and a cupcake. So when we discovered that there was a vineyard called Cupcake we were in a little bit of heaven … which brings us to this week’s Friday Favorites.
Friday Favorites – Thirst Quencher – Red Velvet Cupcake Wine
We were sitting in a giant circle at Making Things Happen, surrounded by some AMAZING women (yes Ryan was the only male in the room), and we were discussing our most perfect ideal day. To our right sat the ever so fabulous Emily Ley. As she described the perfect day with her husband she mentioned “enjoying a glass of Red Velvet Cupcake Wine.” I think our reaction was something like “No way! There is a wine called Red Velvet Cupcake Wine!” We immediately knew we had to try it.
Since then, Red Velvet Cupcake Wine has definitely been on the top of our list of go to wines. It even made an appearance in our promo video and in the photos in the Our Story portion of our website.
From the tasting notes “Our first blended red wine for Cupcake Vineyards has over the top aromas of chocolate, deep rich blackberries, red fruits that follow through the palate to a creamy mocha finish that is unmistakable in its intensity and length, with a hint of coconut. It’s reminiscent of a blackberry chocolate cupcake with a mocha coulis.”
The description alone makes our mouths water.
Plus, what is even better is Cupcake Vineyards tag line – “Live Deliciously” AMAZING!!!
So this Friday for happy hour, grab a bottle of Red Velvet Cupcake Wine and live deliciously!
On a side note, in addition to learning about Red Velvet Cupcake Wine, attending Making Things Happen was definitely one of the best things we ever did for our life and our business. If you are looking to make BIG things happen in your life, you have to attend a conference with Emily, Lara, and Gina while you still can. There are only a few spots left on their final tour so be sure to check it out today!
Earlier this year while we were visiting our good friends Justin & Mary we chatted about the need to have more AMAZING people in our lives. We jokingly said that we needed to create a match.com for small business owners to help us connect with other similar minded people. Although we were joking about this idea, it did spark another idea…
All large businesses and many nonprofits have a Board of Directors. One definition we have heard for a board of directors is a group of people that provides a company with direction and advice. We continued to think on this and thought, why can’t we have a Board of LIFE Directors that would provide us with direction and advice for our LIFE. Why couldn’t we have a Board of LIFE Directors!
We came up with a short mission statement to describe our Board of LIFE Directors:
“The goal of our board of life directors is to surround ourselves by amazing people that we can turn to for advice. People that live a similar lifestyle, have similar values, and people that are not afraid to tell us the honest truth when necessary.”
Next, we came up with two simple duties for our board members.
1. Support us and encourage others in living an AMAZING life. Our lives are short and are not meant to be lived in stress, working jobs we are not passionate about, or living someone else’s dream. As a member of our Board of LIFE Directors you are already living your own AMAZING life, we only ask that you help us to encourage others to do the same. We would love your continued support and feedback on additions to our AMAZING Life Manifesto, ways to improve our message and ideas on how to help others live their own AMAZING life.
2. Provide us with true and honest feedback
In order to grow as a business and a couple we need people that are willing to provide us with true and honest feedback. People that are not afraid to tell us when an idea we think is amazing may actually be off the mark. People that will keep us in check and push us each day to live better, follow our dreams, and never give up. Only with true and honest feedback, will we be able to improve our business, our brand, our message, our life, and the lives of others.
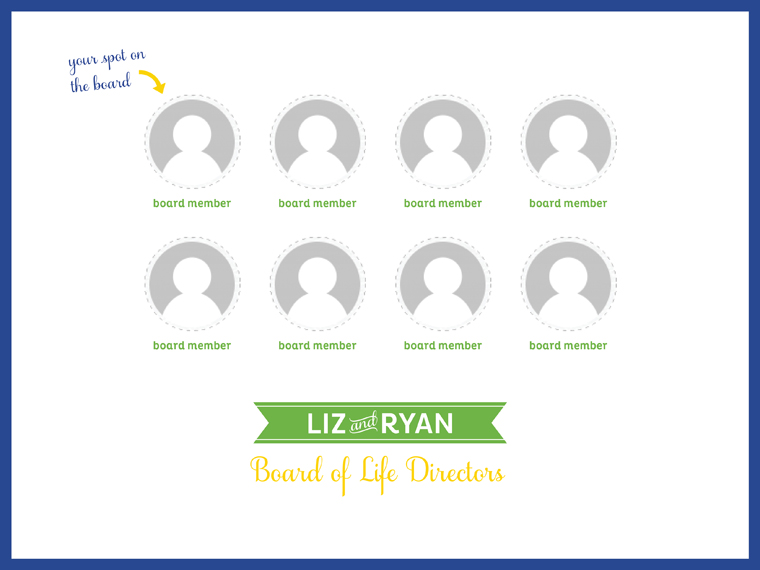
Next, we created a fun little invitation and began inviting our board members:
Currently we have filled half of our board member positions with four AMAZING people. Once we fill out our entire board we plan to ask each member “What does Living an AMAZING life mean to you?” We will then feature each board member and their responses on our blog!
So, this brings us back to the main point of writing this post. We want to encourage everyone to create their own Board of LIFE Directors that will help them to live a more AMAZING life.
Over the weekend, while you are watching the baseball playoffs (let’s go O’s), take the following simple steps to create your own Board:
1. Write out a Mission Statement for your Board. Not sure where to start? Think about what strikes a passion in you, or areas in your life and business in which you need a little extra guidance and craft your Mission Statement around those things.
2. Create a short list of simple duties for your board members. Most people already have super busy lives so be sure to make the duties simple enough that they do not overwhelm your board.
3. Brainstorm a list of people that you would like to have on your board. We hope to have 8 members on our board but you could have 2 or 12. This is your board and there are no rules. Also, you can always add to your board in the future, so don’t worry if you can’t fill all your spots right away.
4. Invite your board members. We created a fun graphic and invited our members via email but feel free to be creative when asking your members to join the board!
For another perspective on creating your own Board of LIFE Directors, be sure to check out Justin and Mary Marantz’s (current members of our board) blog today!
We love cooking, and the only thing better is getting to cook with friends! Homemade pasta making is definitely much easier and more fun when you can get a group of friends together and cook all day long. Although super simple, making fresh pasta is time consuming (and messy!), so if you are going to go through the effort, you might as well make an entire day of it and make enough to share with friends. Plus, if you plan appropriately, pasta making with friends can be a great way to play matchmaker (just ask our friends Brendon and Karen ;) ) There is just something about a bag full of flour that requires it to be used as a flirtation device… but we will leave those stories for later!
This past weekend we got some of our friends together to watch football and make pasta. By the end of the day we had a freezer full of all sorts of different types of pasta. Since we enjoy pasta making so much and we love being able to inspire others to do fun new things, we decided to document the day. In addition to pasta, we also made homemade sauce, all of which you can learn how to make in the recipes below!
If you didn’t already know, I am a big fan of gadgets. So making pasta is a perfect excuse to get out all of our fun Kitchen Aid Mixer attachments. Although not necessary to make pasta, the Kitchen Aid Mixer with ravioli and pasta attachments definitely make things much quicker. For now we still use a hand cranked pasta roller but the pasta roller attachment would definitely be a great Christmas gift! ;) Or, if anyone from Kitchen Aid happens to stumble across our blog, we would love to test it out and feature the results on our blog! ;)
RECIPE: Homemade Pasta Dough
First up is our recipe for fresh pasta dough. Once made, the dough can be used to make a variety of different types of pasta (from ravioli to lasagna to macaroni). Special thanks to our good friend Brendon for sharing his pasta recipe with us!
INGREDIENTS:
1/2 Bag of unbleached white flour
1 full bag of semolina flour
2 eggs
2 – 4 cups of water
1 tbsp of salt (not pictured)
INSTRUCTIONS:
Step 1:Pour the semolina flour and white flour into a mixing bowl and combine using the hook attachment for your KitchenAid Mixer (or by hand with a whisk).
Step 2: Add eggs and salt and mix on low speed or combine by hand. (Be sure to start the mixer on low or flour will be all over your kitchen!… yes, I am speaking from experience!)
Step 3: Slowly add water 1 cup at a time. Pause in between cups to allow the water to soak in and determine how much more you need to add.
This is where things can get a little messy! :) As your dough begins to form you may need to separate it into two bowls and prepare each half separately.
Continue to mix and add small amounts of water until a single ball of dough forms around the mixing hook. The dough should be soft and squishy but not sticky. If your dough seems wet or sticks to your fingers add more flour and continue mixing.
That’s it! Your dough is ready! If you are making ravioli, place it aside and cover with a damp cloth until you are ready to use it. However, don’t let it sit out for more than a few hours as it will begin to dry up.
Onto Part 2 of Pasta Making Magicalness!
RECIPE: Roasted Red Pepper and Tomato Pasta Sauce
Next up is the sauce. You can’t have homemade pasta without homemade sauce! So, we decided to head to the farmers market earlier that day to pick up fresh tomatoes for a homemade sauce. Details are below! :)
INGREDIENTS:
8 to 10 large fresh tomatoes
2 red bell peppers
2 yellow onions
6 – 8 cloves of garlic
1 8oz can of tomato paste
1 tbsp rosemary
1 tsp ground black pepper
1 tsp salt (not pictured)
1 tsp crushed red pepper flakes (not pictured)
2 tbsp olive oil (not pictured)
INSTRUCTIONS:
Step 1: Preheat oven to 325 degrees F.
Step 2: Core and slice the tomatoes. Place them in a glass baking dish in a single layer. Our baking dishes wouldn’t hold all of the tomatoes, so we used multiple. It is important to keep a single layer in order for the tomatoes to roast evenly in the oven.
Step 3: Remove the stem and seeds from the red peppers and slice into 1/2 inch strips. Place in baking dish with the tomatoes.
Step 4: Chop the garlic and onions and add to the baking dish.
Step 5: In a small dish, combine the tomato paste, olive oil, rosemary, salt, crushed red pepper flakes, and pepper.
Once combined together, add the mixture to the baking dish.
Step 6: Place your baking dishes in the oven and bake for 2 hours.
Step 7: With a hot pad, remove the roasted tomatoes from the oven. Using a food processor, blend the mixture to the desired consistency. Be sure to pour in all the juice left over at the bottom of the glass baking dish too!
That’s it! Pour the sauce into a container to use later! Your sauce will last for about a week in the refrigerator or 2-3 months in the freezer.
While our sauce was baking in the oven, we used that time to start making our ravioli!
RECIPE: 4 Cheese and Bacon Ravioli
Ravioli are one of the most versatile pasta dishes. You can fill them with pretty much anything from cheese, to meat, to Nutella (more on that later, I promise!). This time we decide to make a four cheese bacon filling. Thanks Krista for the recipe and helping prepare the mixture!
INGREDIENTS:
4 slices of bacon at room temperature
1 15 oz container of Ricotta Cheese
2 Cups of fresh mozzarella
1 container of fresh gorgonzola (about 1 cup)
1 container of fresh parmigiano reggiano (about 1 cup)
1 tbsp oregano
1 tsp black pepper
Fresh pasta dough
INSTRUCTIONS:
Step 1: Combine the four cheeses, oregano, and pepper in a large bowl.
Step 2: Place bacon in a pan that is at room temperature. Turn on the heat to medium high and cook for approximately 3-4 minutes per side. Allowing the bacon to heat up at the same time the pan will result in more evenly cooked bacon. Also, by allowing the bacon to warm up to room temperature first, instead of just putting it in the pan from the refrigerator, will prevent it from curling. We want the bacon to remain flat and crispy for easy chopping.
Step 3: Once the bacon has cooked, remove from a pan, pat dry with a paper towel to remove the excess fat, chop into small pieces and add to the cheese mixture.
Step 4: Using a small baseball sized ball of pasta dough, flatten in long strips using a pasta roller. Our roller is a hand crank roller, or more appropriate, hands roller. Having extra hands to help at this point is key.
Start by using the widest setting on your roller and crank the past through once.
The first time through may cause the dough to tare or crack. To fix this, simply fold the sheet in half and run it back through the roller again.
Continue to run the pasta through the roller 2-3 more times, reducing the thickness adjustment on your roller each time. Krista cranked the roller while Karen caught the pasta. Your sheet is ready when it is about 1/8 of an inch thick or a little bit thicker than the thickness of a quarter.
Step 5: Time for our Kitchen Aid Ravioli Attachment! Prior to starting, we found that it would help to lightly flour the rollers of the ravioli attachment. Fold your pasta sheet in half and slowly crank the folded edge just into the rollers of the ravioli maker.
Step 6: Add the “hopper” and fill with the four cheese and bacon mixture.
Step 7: Slowly crank the pasta through the ravioli attachment. When the ravioli start to exit the other side grab the pasta to help guide it out. If you go too fast, the ravioli can stick to the rollers and cause a big mess so go slow here.
Continue to add cheese filling and turn the crank slowly on the ravioli attachment until the entire sheet of pasta is used. As you get close to the end of the sheet, remove the extra filling from the hopper that hasn’t been used yet and save for the next sheet.
Step 8:Gently pull apart the ravioli and place on parchment paper. If you are making multiple types of ravioli, be sure to write on the paper so you know which kind is which.
Step 9: Place in the freezer overnight or for at least 2-3 hours.
Step 10:Once the ravioli are frozen, they are ready to cook. Bring a large pot of water to a rolling boil. Add the ravioli and cook for 3-4 minutes. Since these are fresh dough ravioli, they will cook super quickly.
Once all the ravioli float to the top, they are done.
Step 11: While your ravioli are cooking, heat up your homemade pasta sauce in a small sauce pan.
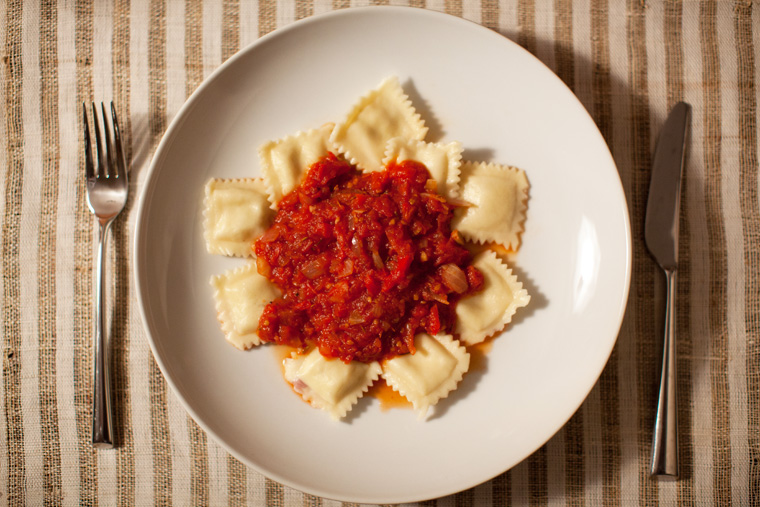
Step 12: Once the ravioli are cooked and your sauce is hot, it’s time to plate and enjoy!
Thanks to Brendon, Karen, Krista, and Liz for helping with Ryan Cooks: Pasta Making Magicalness!
We did have some extra pasta dough leftover and decided to get a little crazy. We made an amazing Nutella Churro Dessert Ravioli. Be sure to check back later this week for the recipe! You won’t want to miss it!

 Sometimes it is the smallest things… but everyday provides a reason to celebrate! We hope you take some time today to celebrate the everyday. For you, maybe its that you got up 15 minutes earlier to make sure you had time to make yourself breakfast, or maybe you made it to the gym today. Who knows… maybe it is just that you washed the dishes instead of letting them sit in the sink so you have to think about it later.