Liz’s DIY: Rustic Monogramed Wood Block
Celebrating the Everyday, Liz's DIY //
A few weeks ago we asked our fabulous intern Caitlin to help us brainstorm some fun DIY projects we could highlight on the blog! She came back with like a million super fun projects that we could do! However, when she showed us a block of wood with writing on it, we got super excited!! Anything with raw wood that could be turned into something chic… we are on it! ;)
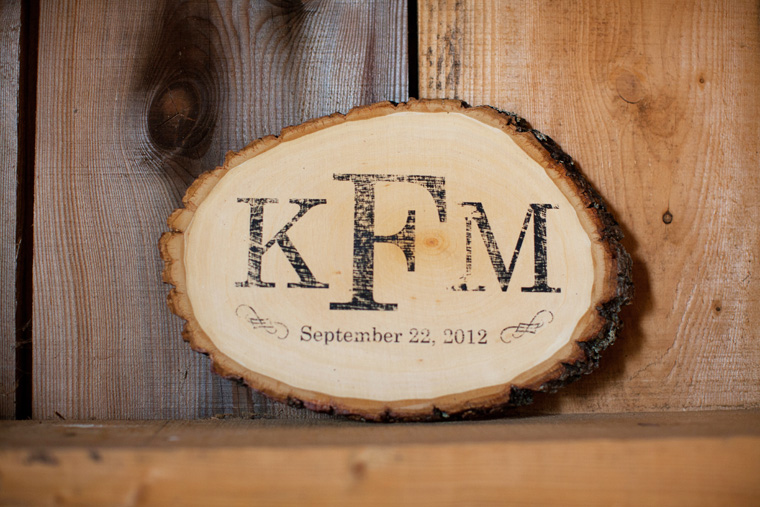
It just so happens that my cousin Kaylene and her now husband, Matt, also have a love for all things rustic. When Caitlin and I were planning the details for this DIY, I couldn’t stop thinking about creating something fun for Kaylene and Matt to have on their wedding day and beyond! We decided to create a monogramed wood block for them!
The results of this project still blows my mind! My friends…. this project is super duper easy and the finished product is definitely something I would display in my house forever!
SUPPLIES WE USED:
- Elmer’s Glue
- Mod Podge
- Paint Brush
- 1 Piece of white Card stock
- 1 Wood Slab (I had no idea, but they sell these real wood slabs in all different shapes and sizes at Michaels! Who knew?!)
ALSO NEEDED:
A design (We used Adobe InDesign to create Kaylene and Matt’s monogram, but you could easily use Microsoft Word or similar program.)


PROJECT INSTRUCTIONS:
Step 1: Paint a solid layer of glue across a full blank sheet of card stock. Leave the painted card stock to dry overnight. (It might be helpful to paint 2 or 3 sheets of the card stock just in case you mess up.) When the paper is dry it will look like the picture below on the right.

Step 2: Design a graphic that you would like to include on the wood slab. This does not have to be a monogram. It could be just 1 word or even a full quote! The possibilities are endless!!! Once you have a design made on your computer, use the design program to reverse the image so that it prints backwards (as seen below). Put the dry piece of card stock in your printer so that the image will print on the glued side. Print the image. (Our printer is a little crazy at times so we had to help guide it through! But it still worked just fine!)

Step 3: Cut off the excess white space around the edges of the printed card stock. Paint a solid layer of Mod Podge onto the wood slab. Before it dries, place the card stock (design side down) onto the wood and press firmly. Use your fingers to rub over the design and release any air bubbles.


Step 4: When the paper feels firmly against the wood without any air bubbles, flip the wood over onto a flat surface. Add extra weight to the top of the wood to assure a constant pressure. Leave the project to dry for 8 hours.


Step 5: This is where the magic happens! Run the wood slab with the card stock attached under hot water. (As hot as your hands can take! Don’t burn yourself!). After a few minutes you will begin to see the card stock bubble. Don’t force the paper away from the wood… just let the water continue to make it bubble. Eventually the paper will come loose from the wood and fall off.


The end result is an awesome looking rustic wood slab! We gave this to Kaylene and Matt the day before their wedding and they ended up using it for some photos on the day of! It is such a great little piece of decor that they can always have in their home to remind them of their special day!!

I love this project and can’t wait to do it again! I am thinking a simple quote would look super awesome and would be great decor for our home! Let us know if you try this project! We would love to see what you do with it! Have fun!